9604095112

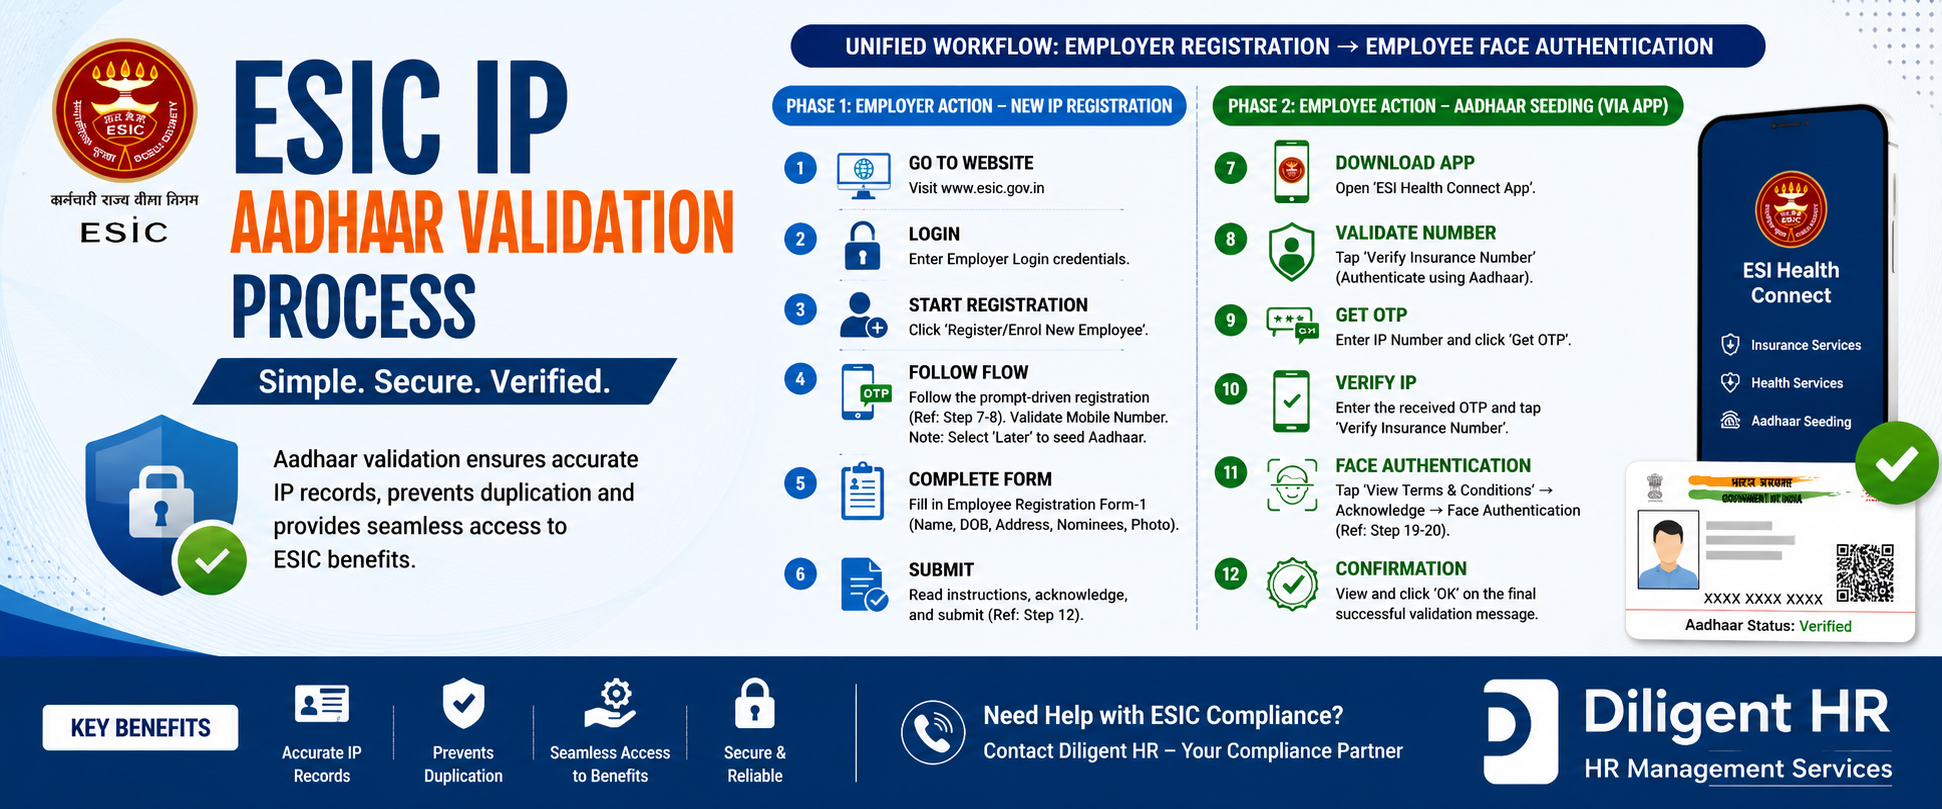

ESIC IP Aadhaar validation is an important process for maintaining accurate and verified Insured Person (IP) records. The process involves two key stages: new IP registration by the employer, followed by Aadhaar seeding and authentication by the employee through the ESI Health Connect App.
The provided ESIC process guide highlights a 30-day validation timeline from the date of IP registration to help ensure smooth access to applicable benefits.
In this article, we explain the ESIC IP Aadhaar validation process in simple steps for employers, HR professionals, payroll teams and employees.
ESIC IP Aadhaar validation is the process of linking and validating an employee's Aadhaar with their ESIC Insurance Number.
The process helps establish the employee's identity and ensures that the ESIC IP record is properly validated.
The workflow is divided into two phases:
Phase 1: Employer Action – New IP Registration
Phase 2: Employee Action – Aadhaar Seeding and Face Authentication
The first phase is completed by the employer through the ESIC employer portal.
The employer should visit the official ESIC website:
The employer can access the required registration services through the ESIC portal.
Enter the employer's ESIC login credentials to access the employer account.
After logging in, select "Register/Enrol New Employee".
This will start the process of registering the employee as a new Insured Person.
Follow the instructions displayed on the ESIC portal.
During the registration process, the employer needs to provide the employee's required information, including the mobile number.
As indicated in the provided guide, where the Aadhaar-seeding option is available during registration, the employer can select "Later" and proceed with the registration.
The employer needs to enter the required employee information.
Important details include:
HR and payroll teams should carefully check the information before submission.
After completing the employee registration form:
Once the registration process is completed, the employee can proceed with the Aadhaar-seeding process.
The second phase is completed by the employee using the ESI Health Connect App.
This phase involves verification of the Insurance Number, OTP authentication and face authentication.
The employee should open the ESI Health Connect App on their mobile device.
The app provides access to the Aadhaar-seeding and authentication facility shown in the provided guide.
Select "Verify Insurance Number".
The employee can then proceed with the Aadhaar authentication process.
Enter the employee's ESIC Insurance Number or IP Number and select "Get OTP".
An OTP will be generated through the authentication process.
Enter the OTP received and select "Verify Insurance Number".
The employee's Insurance Number can then be verified through the application.
After verifying the Insurance Number, proceed to the face-authentication stage.
The guide shows the following flow:
View Terms and Conditions ? Acknowledge ? Face Authentication
The employee should read the applicable terms and conditions and provide the required acknowledgement before proceeding with face authentication.
After successfully completing the validation process, the employee should view the final confirmation message.
The guide indicates that the Aadhaar status should be displayed as:
"Verified"
This indicates that the Aadhaar validation process shown in the guide has been successfully completed.
The provided infographic highlights the following instruction:
"Validate IP within 30 days of registration to avail all benefits smoothly."
Therefore, employers and employees should not unnecessarily delay the Aadhaar validation process after a new IP has been registered.
Recommended process:
Employee Registration ? Insurance Number ? Aadhaar Seeding ? OTP Verification ? Face Authentication ? Verified Status
HR and payroll teams should monitor the process and ensure that employees complete the validation within the timeline mentioned in the applicable ESIC guidance.
Important: ESIC processes and timelines may be updated. Employers should verify the latest applicable ESIC instructions, circulars or portal notifications before treating the 30-day period as a current mandatory compliance deadline.
Aadhaar validation helps maintain accurate employee and Insured Person records.
For employers and HR teams, completing the process can help with:
Correct employee information helps maintain reliable ESIC records.
Aadhaar authentication provides an additional method of validating the identity associated with the Insurance Number.
Completing the validation process can help employees avoid issues associated with incomplete or pending authentication.
HR teams can include Aadhaar validation in their employee onboarding and ESIC compliance checklist.
HR and payroll departments can use the following checklist for every newly registered IP:
Always verify the employee's name, date of birth and other details before submitting the registration.
The mobile number used during the process should be entered carefully.
Registration is not the end of the process. HR teams should follow up with employees to ensure that Aadhaar validation is completed.
After authentication, check whether the Aadhaar status has successfully changed to "Verified".
The provided guide highlights a 30-day validation timeline. HR teams should therefore monitor pending validations and complete them promptly.
It is the process of validating and seeding an employee's Aadhaar with their ESIC Insurance Number or IP record.
The employer or authorized HR representative starts the new employee registration process through the ESIC employer portal.
After IP registration, the employee can complete the Aadhaar-seeding and authentication process through the available ESIC facility, including the ESI Health Connect App flow shown in the guide.
The employee's ESIC Insurance Number, required personal information, mobile number and Aadhaar authentication are involved in the process.
The provided guide indicates that the Aadhaar status is displayed as "Verified" after successful validation.
The provided infographic highlights validation within 30 days of registration to avail benefits smoothly. Employers should verify the latest applicable ESIC instructions before treating this as a mandatory deadline.
ESIC IP Aadhaar validation is an important step in maintaining accurate and properly validated employee records. The process shown in the provided guide follows a two-phase workflow:
Employer New IP Registration ? Employee Aadhaar Seeding ? OTP Verification ? Face Authentication ? Verified Status
For HR and payroll teams, the best practice is to ensure that employee details are entered correctly, the Insurance Number is verified, Aadhaar authentication is completed and the final status is checked.
Keeping track of pending Aadhaar validations can also help employers maintain a smoother ESIC onboarding and compliance process.
Diligent HR – HR Management Services
Payroll | PF | ESIC | Labour Law Compliance
Visit Diligent HR: https://diligenthr.com/
Disclaimer: This article is for general informational purposes. ESIC processes, portal workflows and instructions may be updated from time to time. Employers should verify the latest applicable ESIC instructions, circulars and portal requirements before taking compliance action.